Tutorial
How to publish your MCP server to the MCP Registry
A tested, step-by-step guide to publishing an MCP server to the official MCP Registry: add mcpName to package.json, publish to npm, write server.json, and run mcp-publisher publish so clients and agents can discover it.
Mark
Head of Marketing, MCPOrbit
- Published
- Updated
- · Updated
- Read time
- · 9 min read
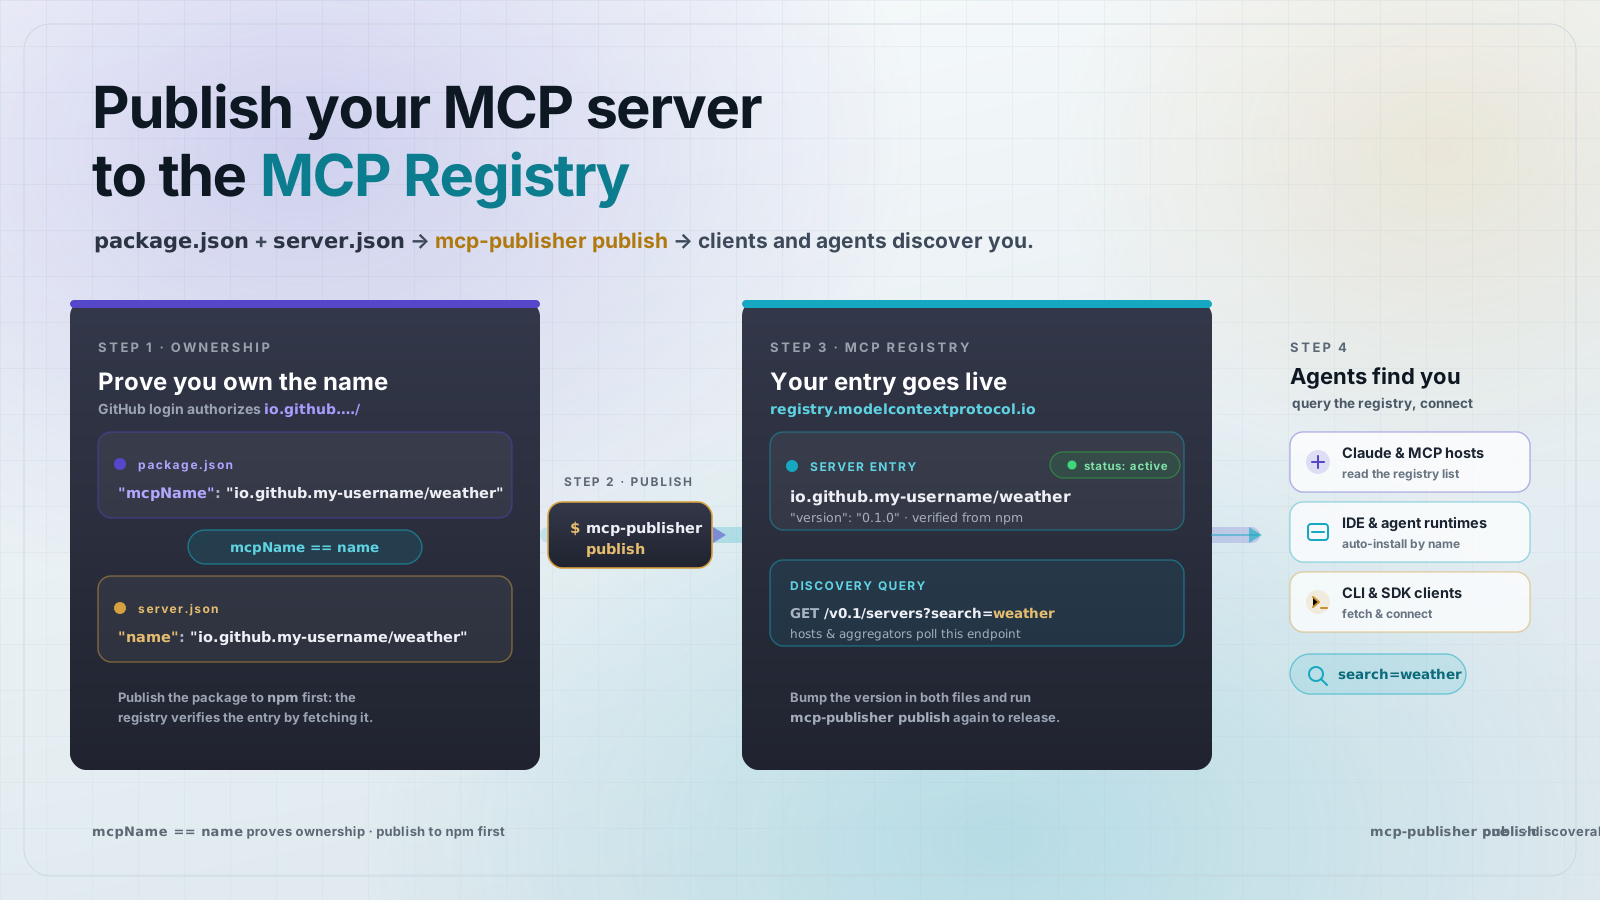
To publish your MCP server to the official MCP Registry, add an mcpName field to your package.json, publish the package to npm (or another supported registry), write a server.json metadata file whose name matches that mcpName, then run mcp-publisher login github and mcp-publisher publish. The registry stores only metadata, not your code, and it is how MCP clients and AI agents discover that your server exists.
This is the step most build-it guides skip. You can write a perfect MCP server, but if it is not listed anywhere a client can query, no agent will ever find it. The MCP Registry at registry.modelcontextprotocol.io is the canonical, open index that host apps and aggregators read from. Getting your server into it is what turns working code into something discoverable.
What is the MCP Registry, and what does it store?
The MCP Registry is a public API at registry.modelcontextprotocol.io that indexes MCP servers. It does not host or run any code. Each entry is a server.json document: a name, a description, a version, and a packages array (or a remotes array for hosted servers) that tells a client where to install or connect. Clients, IDEs, and agent frameworks query the registry to discover servers, then install the referenced package from npm or connect to the referenced URL.
Because the registry only stores metadata, publishing is a two-part act: first you publish your package to a normal package registry like npm, then you publish a server.json record to the MCP Registry that references it. The MCP Registry validates that the two agree before it accepts your entry.
Step 1: Add the mcpName field to package.json
The registry proves you own a package by reading a marker back out of it. For an npm package, that marker is a top-level mcpName field in package.json. Its value is the exact name your server will have in the registry.
{
  "name": "@my-username/mcp-weather-server",
  "version": "1.0.1",
  "mcpName": "io.github.my-username/weather",
  "description": "An MCP server for weather information.",
  "repository": {
    "type": "git",
    "url": "https://github.com/my-username/mcp-weather-server.git"
  }
}
Because we will authenticate with GitHub, mcpName must start with io.github.my-username/, using your real GitHub username. That prefix is the namespace the registry will let your GitHub identity publish under.
Step 2: Publish the package to npm
The registry references your package, so the package has to exist first. Build your distribution files and publish to npm as a public package.
# from your server project directory
npm install
npm run build

# authenticate to npm if you have not already
npm adduser

# publish the package publicly
npm publish --access public
Confirm it is live at https://www.npmjs.com/package/@my-username/mcp-weather-server before continuing. If the package is not published, the MCP Registry will reject your server with a validation error.
Step 3: Install the mcp-publisher CLI
The mcp-publisher tool builds your server.json, authenticates you, and pushes the record. Install the pre-built binary on macOS or Linux:
curl -L "https://github.com/modelcontextprotocol/registry/releases/latest/download/mcp-publisher_$(uname -s | tr '[:upper:]' '[:lower:]')_$(uname -m | sed 's/x86_64/amd64/;s/aarch64/arm64/').tar.gz" | tar xz mcp-publisher \
  && sudo mv mcp-publisher /usr/local/bin/

# or with Homebrew
brew install mcp-publisher

# verify
mcp-publisher --help
Step 4: Generate and edit server.json
Run mcp-publisher init in your project directory. It reads your package.json and writes a server.json template you then edit.
mcp-publisher initThe generated file looks like this. The $schema line pins the schema version, name must equal your mcpName, and the packages array points the registry at your npm package and the transport it speaks.
{
  "$schema": "https://static.modelcontextprotocol.io/schemas/2025-12-11/server.schema.json",
  "name": "io.github.my-username/weather",
  "description": "An MCP server for weather information.",
  "repository": {
    "url": "https://github.com/my-username/mcp-weather-server",
    "source": "github"
  },
  "version": "1.0.1",
  "packages": [
    {
      "registryType": "npm",
      "identifier": "@my-username/mcp-weather-server",
      "version": "1.0.1",
      "transport": {
        "type": "stdio"
      }
    }
  ]
}Step 5: Authenticate with the registry
Log in so the registry knows which namespace you are allowed to publish under. GitHub login uses the device flow: run the command, open the URL, and paste the code it prints.
mcp-publisher login githubGitHub authentication authorizes the io.github.<your-username>/ namespace only. If your server.json name uses a different prefix, the registry returns a permission error. To publish under a custom domain like com.your-company/, use DNS or HTTP authentication instead, which prove you control the domain.
Step 6: Publish and verify it is listed
With the package on npm, server.json valid, and your session authenticated, publish the record.
mcp-publisher publishA successful publish prints the server name and version. Confirm the entry is live by querying the registry search API. This is the same endpoint clients use to discover your server.
curl "https://registry.modelcontextprotocol.io/v0.1/servers?search=io.github.my-username/weather"The response nests each result under a server object, with registry-managed status under _meta. Your server is discoverable once it appears here with status active:
{
  "servers": [
    {
      "server": {
        "$schema": "https://static.modelcontextprotocol.io/schemas/2025-12-11/server.schema.json",
        "name": "io.github.my-username/weather",
        "description": "An MCP server for weather information.",
        "version": "1.0.1"
      },
      "_meta": {
        "io.modelcontextprotocol.registry/official": {
          "status": "active"
        }
      }
    }
  ]
}
How the registry stops you from claiming a package you do not own
Two checks run at publish time. First, the namespace check: your authentication method has to match your server name prefix, so GitHub login can only publish io.github.<your-username>/*. Second, the package check: the registry fetches your referenced npm package and reads its mcpName field, which must equal the server.json name. Together these mean a record can only be published by someone who controls both the identity and the underlying package. That is what makes the registry safe to install from.
Remote servers and non-npm packages
The same flow covers more than stdio npm servers. For a hosted server, replace packages with a remotes array giving the transport type and URL, and clients connect over the network instead of installing anything. For other package ecosystems, set registryType to pypi, nuget, or oci and provide the matching identifier. The mcpName ownership marker has a per-ecosystem equivalent, documented under the registry package-types guide.
Frequently asked questions
- Does the MCP Registry host my server's code?
- No. The registry stores only a metadata record (
server.json). Your code stays on the package registry you already use, such as npm, PyPI, NuGet, or an OCI image. A client reads the registry entry, then installs or connects to the referenced package. - Do I have to publish to npm before publishing to the MCP Registry?
- Yes, for npm-packaged servers. The registry verifies your entry by fetching the referenced package and reading its
mcpNamefield, so the package must already be live. Remote (hosted) servers are the exception: they use aremotesURL and do not need a package. - Why must my server name start with io.github.my-username/?
- Because you authenticated with GitHub. The registry ties each namespace to an authentication method to prove ownership, and GitHub login authorizes the
io.github.<your-username>/prefix. Use DNS or HTTP authentication to publish under a custom domain prefix likecom.your-company/. - What does the error You do not have permission to publish this server mean?
- Your authentication does not match your server's namespace. With GitHub login, the
nameinserver.jsonmust start withio.github.<your-username>/. Re-check the prefix, or log in with the method that owns the namespace you are using. - How do I update or release a new version?
- Bump the version in both
package.jsonandserver.json, publish the new package to npm, then runmcp-publisher publishagain. The registry keeps versions, and thenameplusversionpair identifies the release. - How do clients actually discover my server after I publish?
- They query the registry API, for example
GET https://registry.modelcontextprotocol.io/v0.1/servers?search=<name>. Host apps and aggregators poll this endpoint, so once your entry showsstatusactive it can surface anywhere that reads the registry.
About the author
Mark
Head of Marketing, MCPOrbit
Mark leads marketing at MCPOrbit, the free desktop client for the Model Context Protocol. He writes the build-it and reliability guides, and the code in them is run before it ships.